Saturday, October 31, 2009

Good cakes & bad cakes

Have been baking diligently, more like experimenting new recipes to find the best in each category.

Some really good results for carrot cake... yums (the pictures don't do justice here!!).

And some really BAD and disappointing results for King Arthur Flour's recipes.
KAF Yellow Cake

KAF Fudge Cake

It's especially disappointing when I used only the best butter and cocoa powder - Valrhona from France. The cakes just refused to rise and ended up rock hard :( Is it really caused by the flour?? But the recipe calls for all purpose flour, isn't that like normal flour (except for the branding)? WIll definitely try again with a branded flour, not going to give up. But may use cheaper margarine since it's experimental and there's no guarantee of success.

I must say that I was kind of disheartened with the failures... after so many years of baking I still fail. And this time I had no other choice but keep on trying because I promised to bake a cake for dad's 70th birthday.

So I tried another Valrhona Chocolate Bundt Cake recipe I got from the internet that promised a light and aromatic cake. But I was again disappointed. It hardly rose and definitely not light in texture. Since I was running out of time, I had no choice but to use it.
The fondant part was fun, made and painted some peaches and gold ingots - but I was really pressed for time - I could have done a better job! Anyway, I hope my family enjoyed the cake - if not the taste/texture, at least the 'beauty' of the fondant ;p

Makes me wonder again - do people really SHARE their recipes 100% especially on the internet??

Tuesday, October 27, 2009

Hello Kitty

Somehow my October weekends have been filled with activites, including a short trip to Hong Kong. It was a good holiday, though I was a tad disappointed with the baking tools they have to offer. I visited at least 3 baking supply shops but I came out empty handed. Nothing I can't find here at a much cheaper price ;p And the shops were not easy to locate!

Finally a long weekend came (Deepavali) and I specifically put in my diary that I MUST use the cute Hello Kitty cutters I bought from Japan 4 months back.

And I have not baked this carrot cake (hubby's favourite) for years - time to practise :)

Beautiful orange batter ready for the oven.

Watching the cakes rise in the oven is therapeutic, and of course the cinammon aroma was uplifting :)

Nice golden brown carrot cupcakes ready to be decorated.

Making fondant was the most difficult task in the process. I was sweating buckets and the fondant just refused to leave my fingers alone no matter how hard I kneaded! ;p


Other than that, everything was a breeze... but due to the humid weather, I had no choice but to wake up at 6am to decorate the cakes so that I can bring them fresh to the office for my colleagues (yoga students) :)


Hello Kitty in a box :)


Lessons learnt:

1) The cupcakes for this recipe must not be put in the lower rack as they tend to dry up at the bottom quickly.
2) The base fondant for the Kitty should be thicker and wider to cover the cupcakes completely.

Not entirely satisfied with the results, I tried another carrot cake recipe the following weekend and I think it was fabulous! Did not decorate it though, purely for R&D purposes ;)

Thursday, October 1, 2009

Chocolate Hazelnut Mooncakes

It's mid-Autumn festival tomorrow.

Somehow after tasting homemade mooncakes, I can no longer look at commercial mooncakes in the same light again.

They are always very sweet and oily, perhaps that helps them to preserve longer.

And they cost a bomb. For no good reason, except for the beautiful and colorful packaging.

So this year, despite the tight schedules (with a new niece and all), decided to get mom over to teach me some skills in making mooncakes.

It's actually pretty simple if you buy the lotus paste filling. Next year, when I have more time, I'd like to learn to make the lotus paste.

So this is how a mooncake is produced:

First, knead the dough for the skin till it's soft and pliable.

Next, make a ball with the 3oz filling, and wrap the dough around it evenly.

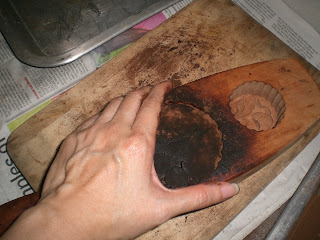
Dust some cocoa powder over the ball, fit it tightly into the mould.

Tadaa! It's ready for baking.

Final results after some egg wash and 30 minutes in the oven.

Verdict: Somehow I have very high expectations for my own products. I actually think we can do better than this! The skin felt a little biscuit-like instead of having the melt-in-your-mouth texture. Maybe that's how it's meant to be? I don't know. Seriously can't remember how it's supposed to taste/feel like since we only eat this once a year ;p

Will do better next year.